The purpose of a trading or investing model is to move probability in your favour. One can be considered worthwhile if it can consistently produce risk adjusted returns in excess of the broad market over any period greater than 2 years. A mechanical trading model can be considered worthwhile if in addition to this it can:
- Remove emotion from decisions.
- Do the hard work so you have the time freedom to enjoy your profits.
Regardless of the time domain of your preferred trading style, being able to clearly slice the market into high probability bullish and bearish periods is of great advantage. So far during the Technical Indicator Fight for Supremacy we have identified three very effective and different ways of doing this:
Below I will cover a quick summary of the previous research or you can jump straight to the latest findings.
.
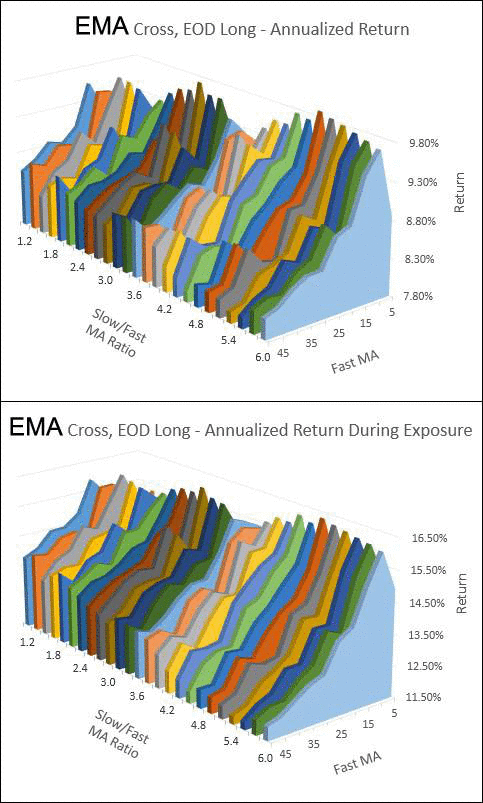
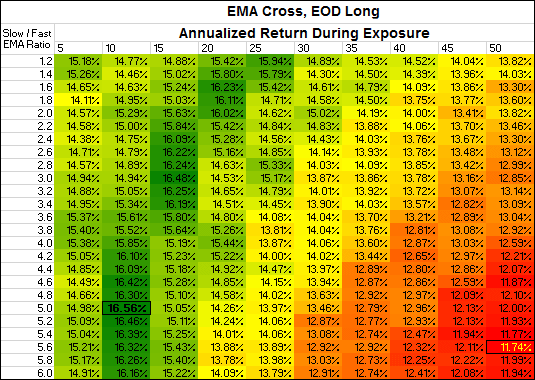
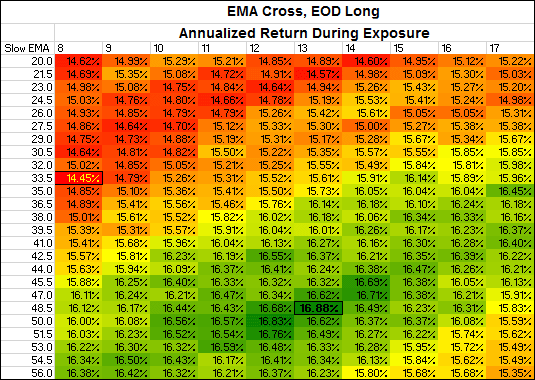
The True Golden Cross
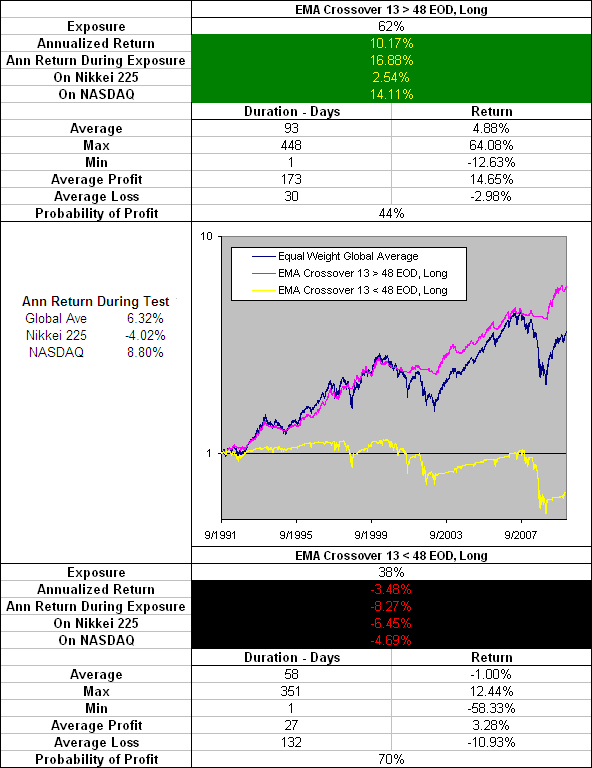
Using a simple 13 / 48 Day EMA crossover; 62% of the time the 13 Day EMA was above the 48 Day EMA. During this time the average trade duration was 93 days and there was an annual return of 10.17% vs 6.32% for the global average during our test period. During the balance of time there was an annual return of -3.48% (see full tests and research).
Conclusion:
EMA(13) > EMA(48) = Bullish
EMA(13) < EMA(48) = Bearish
.
Relative Strength Index

Using a 126 Day RSI (with an EMA instead of Wilder’s Smoothing, it would be 63.5 instead of 126 on a standard RSI) and End OF Week (EOW) signals; 63% of the time the RSI was above 50. During this period the average trade duration was 97 days and there was an annual return of 8.73% vs 6.32% for the global average during our test period. During the balance of time there was an annual return of -2.77% (see full tests and research).
Conclusion:
RSI(126) > 50 = Bullish
RSI(126) < 50 =Bearish
.
Stochastic Oscillator
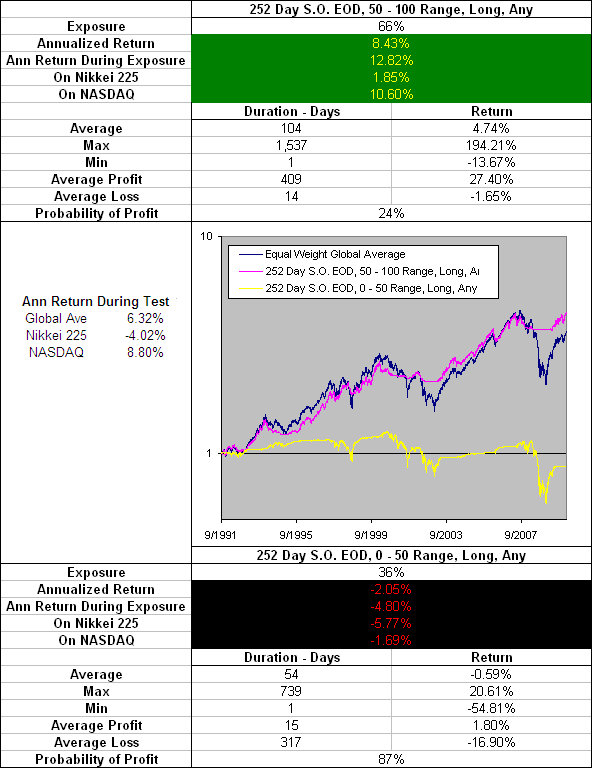
Using a 252 Day Stochastic Oscillator (SO); 66% of the time the SO was above 50. During this period the average trade duration was 104 days and there was an annual return of 8.43% vs 6.32% for the global average during our test period. During the balance of time there was an annual return of -2.05% (see full tests and research).
Conclusion:
SO(252) > 50 = Bullish
SO(252) < 50 = Bearish
.
The Bull and Bear Dichotomy v 1.0 (BBD)
The EMA crossover shows us that there is value in measuring shorter term momentum vs longer term momentum. The RSI shows us that there is value in a measure of declines vs advances. While the Stochastic Oscillator shows us that there is value in being long a market when it is in the top half of its range. The trade profile for each indicator is desirable but their signals are often in conflict.
Don Beasley of Trademark Capital has been an inspiration of mine for many years and has been kind enough on several occasions to share his insight and experience. He likes to combine the RSI and Stochastic Oscillator by taking an average of the two. This is straight forward because both move between the same 0-100 range.
Including the EMA crossover is not as straight forward however; it is not limited to a scale at all. But because the percentage distance between the EMA(13) and EMA(48) should be normally distributed we decided to force it into a 0-100 range by using the cumulative distribution of a bell curve. It has a SD of 2.17% when EMA(13) > EMA(48) and SD of 2.35% when EMA(13) < EMA(48):
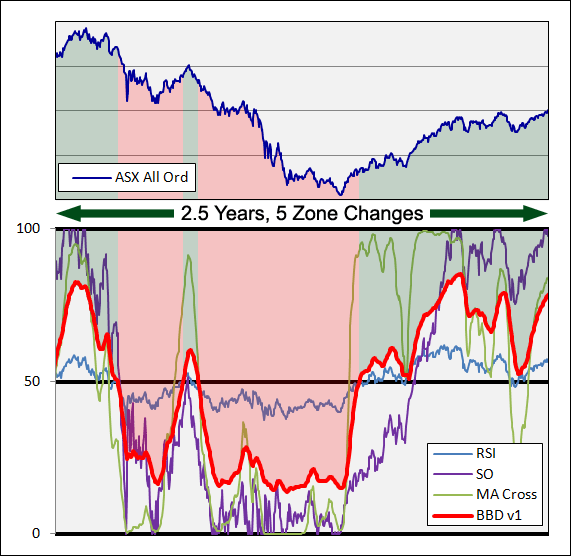
Above you can see the readings from each indicator during a randomly selected 2.5 year period on the Australian All Ordinaries Index. The thick red line is an equally weighted average of the RSI, SO and MA Cross, smoothed with a EMA(10). This we are calling the Bull / Bear Dichotomy or BBD Indicator v1. By combining all three indicators, a greater level of stability and robustness is achieved. See below the full trade profile:
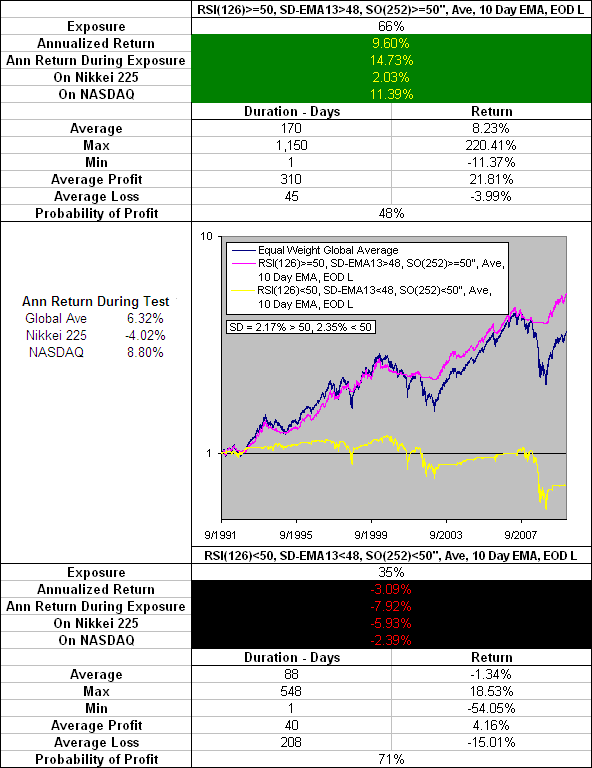
In looking at the trade profile the signal stability is clear with an average trade duration of 170 days, an average profit of 21.81% and a probability of profit sitting at 48%! The other statistics are not dissimilar to the component indicators. The only thing missing from the BBD is a measure of volume. We plan to include this in v2 and this will hopefully improve the stability further.
It is highly likely that that we are reaching the upper limits of what is possible, as far as returns, from a long term indicator applied to a blind selection of broad market indices. To improve on these results it will be necessary to do one or a combination of the following:
- Have a selection process for the assets to be traded.
- Apply a secondary trading system specifically designed to perform during the bullish or bearish environments identified by the BBD.
How do think these results could be improved? What other long term measures would be worth researching for inclusion in v2 of The Bull / Bear Dichotomy Indicator?
Please note: These returns are the result of evenly allocating funds between 16 different global test markets. If only one market was on a buy signal then only 1/16th of the capital was exposed to the market. Some markets performed better than others and lifted the returns. All were profitable and the strategy outperformed on an absolute basis on 15/16 of the test markets. A further explanation of the methodology can be found here.